Gesso is a term used to describe a liquid preparation to prime wood panels. Gesso is the Italian word for gypsum but has come to mean the ground or primer for painting panels. This gel-like mass, having the consistency of cream when warm, consists of chalk or gypsum and animal collagen glue in a solution with water. This gel-like mass, having the consistency of cream when warm, consists of chalk or gypsum and animal collagen glue in a solution with water. This article provides recipes for sizes and grounds and step-by-step instructions on preparing and applying gesso to wood panels.
Although the discussion describes preparing a glue ground for a wooden icon, a sacred object in the Christian Orthodox religion, the information applies to preparing and applying a glue ground to any type of wood panel. The instructions are based on the Russian practice of preparing icons so that you will find Russian terms for different parts of an icon.
Materials Required
-
Animal collagen glue (rabbit skin glue, hide glue or technical gelatin),1
-
Chalk of the highest quality,
-
Freshly boiled water,
-
Flat, bristle brush (3–3.5 cm or 1–1.5 inches wide),
-
Plastic or stainless steel spatula,
-
Piece of thin cotton or linen cloth, which in Russian icon painting is called “pavoloka,”
-
Awl or a medium-sized nail,
-
Electric or gas stove,
-
Water bath (pan with water on the bottom of which is placed cloth folded several times to avoid overheating the glue solution or ground), and
-
Weighing scale (preferably a metric scale with an electronic display).
Before you begin the process of priming the board, it is necessary to calculate the amount of glue (and in the future, chalk) that will be needed to prepare the ground. Experience shows that 3 grams of dry glue is sufficient for 100 square centimeters (15.5 square inches) of board.2
Priming icon boards is a tedious and lengthy process. It consists of three basic steps:
-
Sizing with a 4–5% glue solution.
-
Gluing pavoloka (thin cotton or linen fabric) with 15–16% glue solution.
-
Applying levkas (Russian word for primer) consisting of 11–12% solution of animal glue (rabbit skin glue) with chalk.
It is important to note that the total amount of glue needed for the primer (as shown above), is easy to calculate. Calculate the amount of dry glue required for sizing the board, the pavoloka, and the ground based on the total area. We recommend the following for each stage: if 30 grams is the total amount needed, the sizing will require about 8–10% of the total amount of dry glue; the pavoloka, 35–37%; and the ground, 55% dry glue. Calculating the amount of glue in grams is not complicated.
We now consider the process of priming boards from start to finish.
Sizing the Wood Panel
Size the board twice with hot 4.5% glue solution. To do this, pour the required amount of freshly boiled water into a clean container (e.g., a glass jar). Next, add the right amount of glue.3 If the glue needed is 3 grams, for instance, then the amount of water required should be 20 times that amount, i.e., 60 grams. After this, cover the container of the glue solution with a damp, thick cloth folded several times to prevent water evaporation, and leave the solution to swell for several hours. While the glue swells, scratch the front side of the board with a sharp nail or awl. This is done so that the ground better grips the board. Scratch lines on the board’s surface approximately 1.5–2.0 cm (0.50–0.75 inch) apart. After the glue swells (usually 6–10 hours—the time required for swelling is directly proportional to the amount of glue), place the solution on the water bath, heat and mix well with a spatula. The solution should be homogeneous, fluid, and hot.4
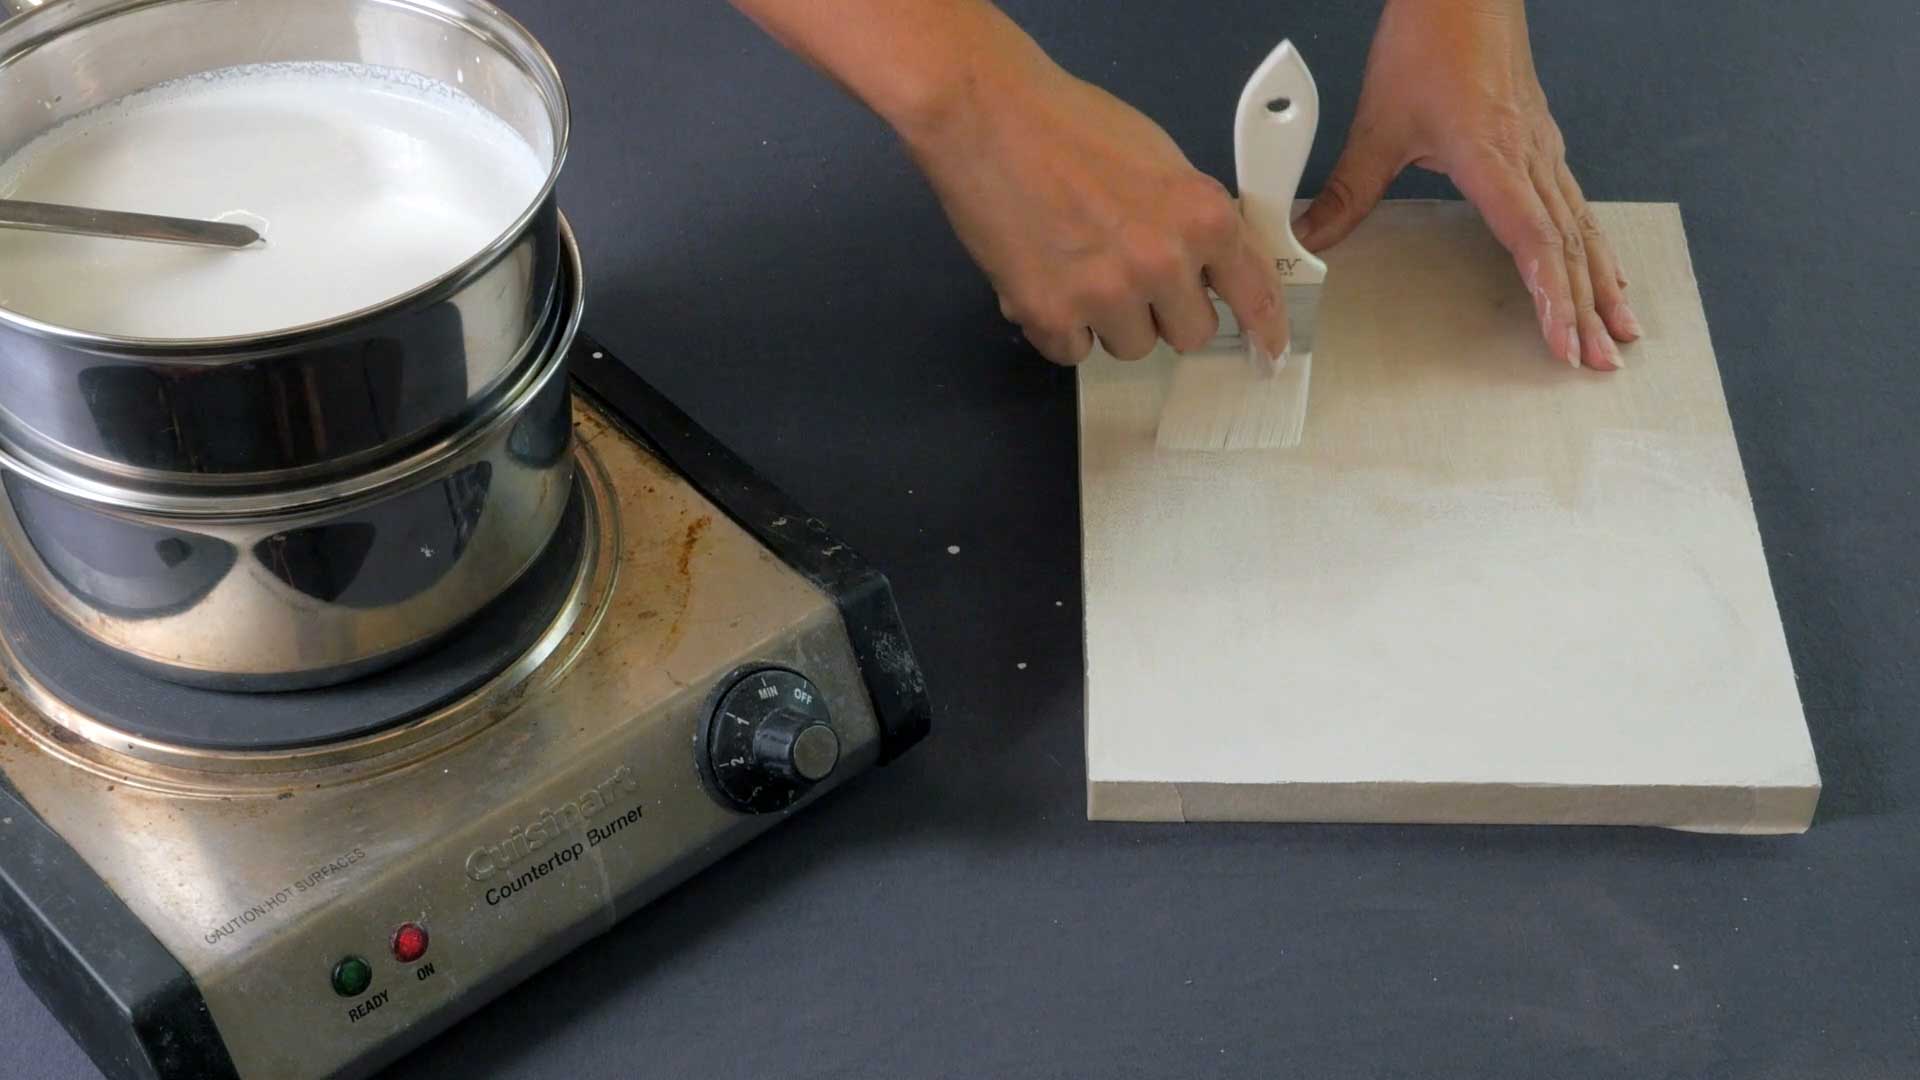
Apply the glue solution with a wide, flat bristle brush, smoothly and without dripping. When the board dries (the length of time required depending on the temperature and humidity) repeat the process.
On the following day glue the pavoloka onto the board.
Pavoloka or Fabric Cover
Pavoloka (Russian for “cover”)—a thin, usually cotton or linen, fabric glued onto the front surface of the board—is applied to the wood to avoid cracking of the ground.
Glue the pavoloka the day after sizing the board. Prepare the glue solution, however, in advance. For the size, prepare a 15–16% glue solution (the ratio of parts by weight of glue to water is about 1:5.5). First, determine the necessary amount of glue. As mentioned above, the pavoloka requires 35–37% of the total amount (100%) of dry glue used to prepare the board, as calculated in the previous section (see 1.1).
Soak the necessary amount of glue (1 part) in 5.5 parts of cold water, after which cover the container with a thick, damp cloth folded several times and leave for 6–10 hours to swell. After the glue in the solution is swollen, place the container on a water bath, heat to but not exceeding 60° C. and stir until smooth. After that, take a piece of thin cloth5 larger than the board it will cover, extending approximately 0.5 cm (almost 0.25 inch) on each side, and soak it in the warm glue solution for at least one hour. Instead of closing the container with a lid to avoid evaporation, cover it with a thick, damp cloth folded several times.
Before gluing the fabric onto the board, warm the glue solution with the pavoloka in the water bath. Remove it when warm and spread the material tightly and without wrinkles over the entire face of the board without stretching it or applying too much tension to the fabric. While applying the fabric, do not be overly concerned about the appearance of air bubbles, i.e., blisters that appear underneath the cloth. Smooth the adhered fabric with your hand from the center outward to the edges to avoid their formation. If bubbles reappear, you can easily remove them with a sharp blade by making a longitudinal incision. To ensure better adhesion of the fabric to the surface of the board, we recommend smoothing the fabric over the entire surface with the back of a large metal spoon without applying too much pressure.
Once the fabric dries (minimum of 12 hours), remove small (1–2 mm diameter) air bubbles by cutting them off with a sharp razor blade. For larger bubbles, make two incisions crosswise, lift the corners of the notched fabric, and glue them down with warm 15–16% glue solution, then smooth them out with the back of a spoon.6 Before priming remove the excess fabric at the edges of the board by cutting with a sharp blade. This is done the day after the pavoloka is applied and immediately before applying the primer.
Priming the Wood Panel
Priming the board is done in two stages. The first phase—a thin, liquid gesso, so-called “milk”—is applied in two layers. The second stage is the consistent application of a much more dense ground (8–10 layers). We now consider each stage separately.
First Stage Priming—“Milk” Coats
While the pavoloka dries on the face of the board, prepare a 11–12% glue solution. The ratio of glue to water is 1:8 (1:7.5).7 Once this solution is ready, stir well and heat on a water bath to 60° C. Once the solution is hot, sift in small portions of the dry chalk8 and mix well with a large spatula. The consistency of the hot solution should be like milk or thin cream.9
Allow the chalk to wet thoroughly in the solution for one hour, after which heat the solution again and mix well. At the time of its application to the board, the temperature of the primer should be about 35° C. Apply the primer generously with the flat bristle brush. While the primer is still somewhat wet, it is important to rub it into the weave of the fabric by hand. After the first layer has dried, apply another coat in the same manner. The chalk will settle to the bottom of the container during these operations, so to maintain a homogeneous solution, it is necessary to stir it well before and during the application of the primer.10
Second or Main Stage of Priming
After the second or “milk” layer, warm the remainder of the primer on a water bath to a temperature of 40–50° C. With constant stirring of the solution, add the remaining chalk in small amounts. Once the chalk appears to be well mixed, it is recommended to further knead it by hand. One way to do this is to pour the primer into a nylon stocking and squeeze it out through the mesh into a container. There should not remain any lumps of chalk. Next, cover the container of the chalk primer with a damp, thick cloth and leave overnight in a cool place.
The next day warm up the primer and again mix well. The consistency should be similar to sour cream. The priming solution should be warm, about 35° C. Apply the primer with a wide, flat bristle brush or spatula (a plastic spatula is usually best).11 Apply each coat uniformly over the surface of the board (preferably using single brush strokes without much overlap). Apply each successive layer of primer only after the surface of the previous layer dries. Alternate the direction of the brush or spatula with each new layer of primer. For example, apply the first layer with vertical strokes, then apply the second in the horizontal direction, and so on. The number of layers (10–12) depends on the thickness of the ground and, therefore, may fluctuate. The time for drying of each layer varies from half an hour to an hour, depending on the temperature and humidity, wood absorbency, layer thickness, etc.
We recommend adding in each subsequent layer of ground a small amount (5 drops from a pipette) of 5% ethanol (ethyl alcohol). This helps the glue solution in the ground to wet the substrate better, because it lowers the surface tension of the glue solution. Cover the container with a damp, thick cloth to avoid evaporation of water from the primer while working and during breaks.
Do not hasten the drying of the ground with heat or by exposing it to direct sunlight. While applying the ground to the surface of the board, it is inevitable that small elevations or grooves form that you can easily clean up but only after the layer dries. The uneven surface can be scraped smooth with a razor blade, held perpendicularly to the surface of the board, or with 400-grit sandpaper (or emery paper). The applied ground should be dried naturally. Typically, drying overnight, the ground will be ready in the morning for sanding.12
Polishing the Glue Ground
To polish the ground, first use 400-grit sandpaper. Then use 600, 800 and 1000 grit, i.e., more and more fine-grained. Remove caked-on ground from the sandpaper from time to time. In places where you will gild, polish the surface carefully. Once the surface of the ground becomes silky smooth and you have removed all traces of chalk dust, you can begin painting on the board.
Notes
1 The best is sturgeon glue; its only drawback is its high cost.
2 For example, to calculate the total amount of glue needed for a board with a surface area of 1000 cm2 (155 in2), multiply 10 x 3 = 30 g. This calculation allows for a small amount of leftover glue.
3 A 4–5% glue solution involves an approximate ratio of glue to water 1:20.
4 The solution should be heated to about 60° C. and not higher because a glue solution heated above that temperature begins to lose its adhesive properties. To determine the correct temperature without a thermometer, a finger dipped into the solution should be uncomfortable but able to withstand this temperature.
5 If the fabric is new, it should be washed in a hot soap solution.
6 The most challenging place to apply the fabric is in the luzga (the 45° angled borders that divide the inside of the icon’s front side [called kovcheg, literally “ark” in Russian] from its outside margins). We recommend that while applying the fabric along the luzga, make an incision in the corner and, if necessary, along the perimeter (the blade must be very sharp). It is especially important to observe that the fabric is very well pressed into the four corners of the luzga.
7 If using technical gelatin, the ratio of glue to water is the same as in the above preparation of the glue solution containing rabbit skin glue. If using hide glue for sizing and the ground, the primer will require a 9–10% glue solution (the ratio of glue to water is 1:10).
8 The amount of chalk needed for both stages of the primer is calculated as follows: the amount of chalk should be 10–12 times greater than the weight of the dry glue in a solution. Thus, the weight ratio of dry glue to the chalk is 1:10 to 1:12.
9 Upon cooling, the ground becomes a jelly-like state.
10 The larger the board and, consequently, the more glue and chalk needed for the ground, the more carefully and frequently the primer should be stirred.
11 Another way of applying the ground is to drop the primer in puddles with the bristle brush onto the kovcheg of the icon board, and then, before the primer dries, spread it out with a spatula, holding it at a 30° angle. After covering the kovcheg of the icon board with the primer, apply it to the outside margin in the same manner as the kovcheg. After applying 8–10 layers, apply the last 2–3 coats with a spatula, keeping it at a 45–50° angle.
12 There is another way of applying the ground, which can be recommended to those who already have experience priming with chalk or gesso grounds. Apply the first half of the layers by brush with warm primer at a temperature of about 35° C. Apply the layers sequentially—first in one direction, and after each dries, in another direction perpendicular to the preceding, and so forth. Around the sixth layer, apply the primer without warming in a gel-like state using a spatula along the outside margins and the edges, then go to the main part of the icon. Apply the first layer, holding the spatula at an acute angle (about 30°). Apply the last few layers, keeping the spatula at an angle of 45–50°. Between layers, it may be necessary to sand the ground with 400-grit sandpaper lightly.